nopCommerce
Introduction
We show how to deploy a free and open-source ecommerce on the ThreeFold Grid. We will be deploying on a full VM with an IPv4 address.
nopCommerce is an open-source ecommerce platform based on Microsoft's ASP.NET Core framework and MS SQL Server 2012 (or higher) backend Database.
Prerequisites
- A TFChain account
- TFT in your TFChain account
Deploy a Full VM
We start by deploying a full VM on the ThreeFold Dashboard.
- On the Threefold Dashboard, go to the full virtual machine deployment page
- Deploy a full VM (Ubuntu 22.04) with an IPv4 address and at least the minimum specs shown below
- IPv4 Address
- Minimum vcores: 2 vcores
- Minimum GB of RAM: 4 GB
- Minimum storage: 50 GB
- After deployment, note the VM IPv4 address
Create an SSH Tunnel
We create an SSH tunnel with port 5432:80, as it is this combination that we will set for nopCommerce on the docker-compose file.
- Open a terminal and create an SSH tunnel
ssh -4 -L 5432:127.0.0.1:80 root@VM_IPv4_address>
Simply leave this window open and follow the next steps.
Preparing the VM
We prepare the full to run nopCommerce.
- Connect to the VM via SSH
ssh root@VM_IPv4_address - Update the VM
apt update - Install Docker
- Install docker-compose
apt install docker-compose -y
Set a Firewall
You can set a firewall to your VM for further security. This should be used in production mode.
- Add the permissions
-
ufw allow 80
ufw allow 443
ufw allow 22
-
- Enable the firewall
-
ufw enable
-
- Verify the fire wall status
-
ufw status verbose
-
Download nopCommerce
- Clone the repository
git clone https://github.com/nopSolutions/nopCommerce.git
cd nopCommerce - Build the image
cd nopCommerce
docker-compose -f ./postgresql-docker-compose.yml build - Run the image
docker-compose -f ./postgresql-docker-compose.yml up
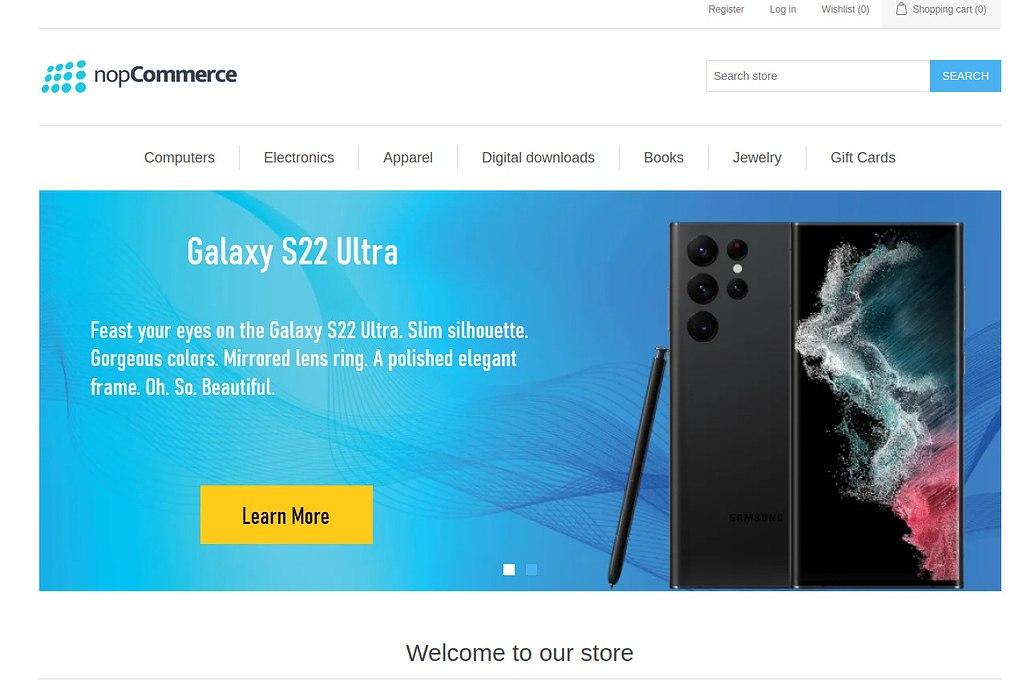
Access nopCommerce
You can access the nopCommerce interface on a browser with port 5432 via the SSH tunnel:
localhost:5432
For more information on how to use nopCommerce, refer to the nopCommerce docs.
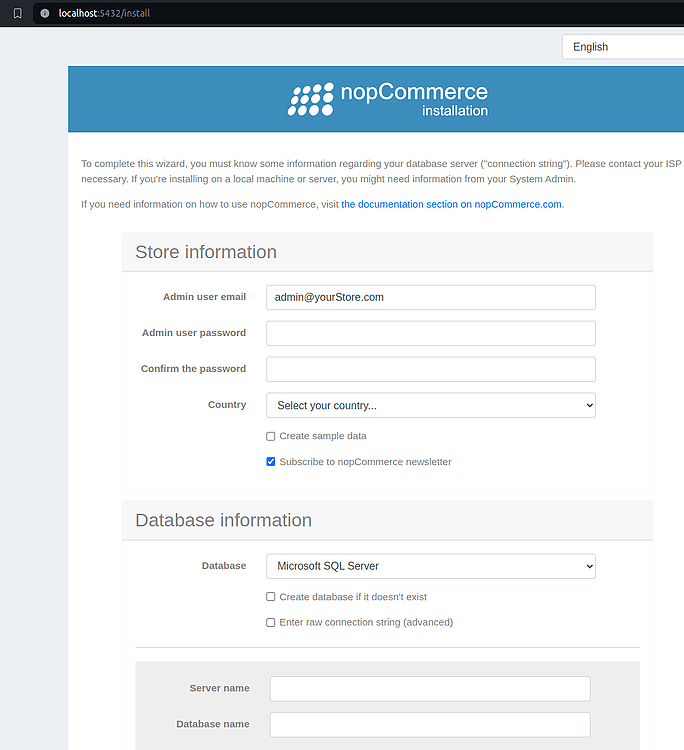
Install nopCommerce
You will need to set your ecommerce store and database information.
- Enter an email for your website (e.g.
admin@example.com) - For the database, choose PostgreSQL and check both options
Create a databaseandEnter raw connection. Enter the following information (as per the docker-compose information)Server=nopcommerce_database;Port=5432;Database=nop;User Id=postgres;Password=nopCommerce_db_password; - Note: For production, you will need to set your own username and password.
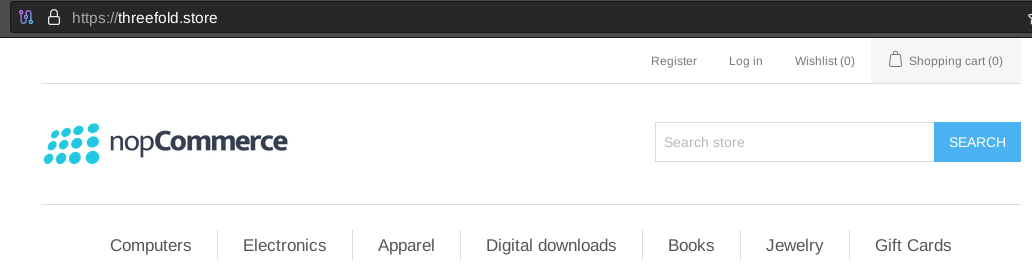
Access the Ecommerce from the Public Internet
Set a DNS Record
- Go to your domain name registrar
- In the section Advanced DNS, add a DNS A Record to your domain and link it to the IP address of the VM you deployed on:
- Type: A Record
- Host: @
- Value: "IPv4_Address"
- TTL: Automatic
- It might take up to 30 minutes to set the DNS properly.
- To check if the A record has been registered, you can use a common DNS checker:
-
https://dnschecker.org/#A/example.com
-
- In the section Advanced DNS, add a DNS A Record to your domain and link it to the IP address of the VM you deployed on:
Access the Ecommerce�
You can now go on a web browser and access your website via your domain, e.g. example.com.
HTTPS with Caddy
We set HTTPS with Caddy.
- Install Caddy
apt install -y debian-keyring debian-archive-keyring apt-transport-https curl
curl -1sLf 'https://dl.cloudsmith.io/public/caddy/stable/gpg.key' | gpg --dearmor -o /usr/share/keyrings/caddy-stable-archive-keyring.gpg
curl -1sLf 'https://dl.cloudsmith.io/public/caddy/stable/debian.deb.txt' > /etc/apt/sources.list.d/caddy-stable.list
apt update
apt install caddy - Set a reverse proxy on port 80 with your own domain
caddy reverse-proxy -r --from example.com --to :80
You should see in the logs that it successfully obtains an SSL certificate, and after that you can try navigating to your site's domain again to verify it's working. Using a private window or adding https:// specifically might be necessary until your browser drops its cache.
When you're satisfied that everything looks good, hit ctl-c to exit Caddy and we'll proceed to making this persistent.
Manage with Systemd
We create a systemd service to always run the reverse proxy for port 80.
- Create a caddy service
nano /etc/systemd/system/caddy.service - Set the service with your own domain
[Unit]
Description=Caddy Service
StartLimitIntervalSec=0

[Service]
Restart=always
RestartSec=5
ExecStart=caddy reverse-proxy -r --from example.com --to :80

[Install]
WantedBy=multi-user.target - Enable the service
systemctl daemon-reload
systemctl enable caddy
systemctl start caddy - Verify that the Caddy service is properly running
systemctl status caddy
Systemd will start up Caddy immediately, restart it if it ever crashes, and start it up automatically after any reboots.
Access Admin Panel
You can access the admin panel by clicking on Log in and providing the admin username and password set during the nopCommerce installation.
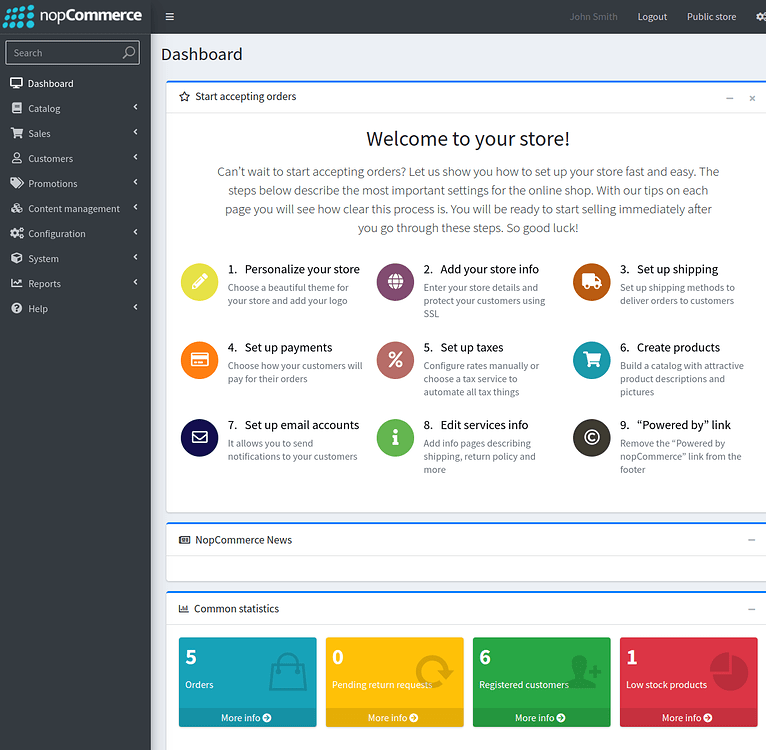
In Add your store info, you can set the HTTPS address of your domain and enable SSL.
You will need to properly configure your ecommerce instance for your own needs and products. Read the nopCommerce docs for more information.
Manage nopCommerce with Systemd
We create a systemd service to always run the nopCommerce docker-compose file.
- Create a nopcommerce service
nano /etc/systemd/system/nopcommerce.service - Set the service with your own domain
[Unit]
Description=nopCommerce Service
StartLimitIntervalSec=0

[Service]
Restart=always
RestartSec=5
StandardOutput=append:/root/nopcommerce.log
StandardError=append:/root/nopcommerce.log
ExecStart=docker-compose -f /root/nopCommerce/postgresql-docker-compose.yml up
[Install]
WantedBy=multi-user.target - Enable the service
systemctl daemon-reload
systemctl enable nopcommerce
systemctl start nopcommerce - Verify that the Caddy service is properly running
systemctl status nopcommerce
Systemd will start up the nopCommerce docker-compose file, restart it if it ever crashes, and start it up automatically after any reboots.
References
For further information on how to set nopCommerce, read the nopCommerce documentation.
Questions and Feedback
If you have any questions or feedback, please let us know by either writing a post on the ThreeFold Forum, or by chatting with us on the TF Grid Tester Community Telegram channel.